Back buffer và surface thực chất là giống nhau và đều được quản lý bởi interface IDirect3DSurface9, khi cài đặt chương trình để lấy Back buffer thông qua hàm IDirect3DDevice9::GetBackBuffer(). Khi sử dụng đối tượng ID3DXSprite chỉ cần gọi hàm D3DXCreateSprite() để kết nối đối tượng Sprite với Device.
Load Sprite sử dụng đối tượng D3DXSprite trong DirectX 9
Hiển thị 1 sprite lên màn hình có nhiều cách, có thể nạp 1 sprite vào surface và thực hiện các thao tác vẽ nó lên màn hình, y như thao tác ảnh với tập tin bitmap. Còn 1 cách nữa là sử dụng đối tượng D3DXSprite, rất thuận lợi cho việc vẽ sprite trong suốt và các thao tác flip, rotation, scale, translate.
Chuẩn bị project với những thiết lặp ban đầu
Khởi tạo cửa sổ Windows, khởi tạo DirectX, tạo game loop, ... thực hiện công việc chuẩn bị để load 1 sprite.
Mở Visual Studio -> tạo mới 1 project và cài đặt môi trường hỗ trợ DirectX 9 -> tạo mới tập tin MainPrg.cpp -> sau đó copy source code đã chuẩn bị bên dưới để thực hiện các thao tác với sprite.
// include the basic windows header files and the Direct3D header file
#include <Windows.h>
#include <d3d9.h>
#include <d3dx9.h>

// global declarations
LPDIRECT3D9 d3d;            // the pointer to our Direct3D interface
LPDIRECT3DDEVICE9 d3ddev;   // the pointer to the device class

// function prototypes
void initD3D(HWND hWnd);    // sets up and initializes Direct3D
void render_frame(void);    // renders a single frame
void cleanD3D(void);        // closes Direct3D and releases memory

// fucntion prototypes for sprite
void initSprite();
void drawSprite();

// the WindowProc function prototype
LRESULT CALLBACK WindowProc(HWND hWnd, UINT message, WPARAM wParam, LPARAM lParam);

// the entry point for any Windows program
int WINAPI WinMain(HINSTANCE hInstance,
	HINSTANCE hPrevInstance,
	LPSTR lpCmdLine,
	int nCmdShow)
{
	HWND hWnd;          // the handle for the window, filled by a function
	WNDCLASSEX wc;      // this struct holds information for the window class

	ZeroMemory(&wc, sizeof(WNDCLASSEX));

	wc.cbSize = sizeof(WNDCLASSEX);
	wc.style = CS_HREDRAW | CS_VREDRAW;
	wc.lpfnWndProc = WindowProc;
	wc.hInstance = hInstance;
	wc.hCursor = LoadCursor(NULL, IDC_ARROW);
	wc.hbrBackground = (HBRUSH)COLOR_WINDOW;
	wc.lpszClassName = L"WindowClass";

	// register the window class
	RegisterClassEx(&wc);

	// create the window and use the result as the handle
	hWnd = CreateWindowEx(NULL,
		L"WindowClass", 					// name of the window class
		L"Load Sprite Direct3D Program",  	// title of the window
		WS_OVERLAPPEDWINDOW,   				// window style
		300, 300, 							// x, y - position of the window
		600, 400, 							// width, height of the window
		NULL,   							// we have no parent window, NULL
		NULL,								// we aren't using menus, NULL
		hInstance, 							// application handle
		NULL);  							// used with multiple windows, NULL

	// display the window on the screen
	ShowWindow(hWnd, nCmdShow);

	// set up and initialize Direct3D
	initD3D(hWnd);

	// set up and initialize Sprite
	initSprite();

	// this struct holds Windows event messages
	MSG msg;

	// wait for the next message in the queue, store the result in 'msg'
	while (TRUE)
	{
		while (PeekMessage(&msg, NULL, 0, 0, PM_REMOVE))
		{
			// translate keystroke messages into the right format
			TranslateMessage(&msg);
			// send the message to the WindowProc function
			DispatchMessage(&msg);
		}

		if (msg.message == WM_QUIT)
			break;

		render_frame();
	}

	// clean up DirectX and COM
	cleanD3D();

	// return this part of the WM_QUIT message to Windows
	return msg.wParam;
}

/////////////////////////////////////////////////////////////////////
// load Sprite here
/////////////////////////////////////////////////////////////////////
void initSprite()
{

}

void drawSprite()
{

}
///////////////////////////////////////////////////////////////////

// this is the main message handler for the program
LRESULT CALLBACK WindowProc(HWND hWnd, UINT message, WPARAM wParam, LPARAM lParam)
{
	// sort through and find what code to run for the message given
	switch (message)
	{
	// this message is read when the window is closed
	case WM_DESTROY:
	{
		PostQuitMessage(0);        // close the application entirely

		return 0;
	} break;
	}
	// Handle any messages the switch statement didn't
	return DefWindowProc(hWnd, message, wParam, lParam);
}


// this function initializes and prepares Direct3D for use
void initD3D(HWND hWnd)
{
	d3d = Direct3DCreate9(D3D_SDK_VERSION);    	// create the Direct3D interface

	D3DPRESENT_PARAMETERS d3dpp;    			// create a struct to hold various device information

	ZeroMemory(&d3dpp, sizeof(d3dpp));    		// clear out the struct for use // fill null
	d3dpp.Windowed = TRUE;    					// program windowed, not fullscreen
	d3dpp.SwapEffect = D3DSWAPEFFECT_DISCARD;   // discard old frames
	d3dpp.hDeviceWindow = hWnd;    				// set the window to be used by Direct3D

	// create a device class using this information and the info from the d3dpp stuct
	d3d->CreateDevice(D3DADAPTER_DEFAULT,
		D3DDEVTYPE_HAL,
		hWnd,
		D3DCREATE_SOFTWARE_VERTEXPROCESSING,
		&d3dpp,
		&d3ddev);
}

// this is the function used to render a single frame
void render_frame(void)
{
	// clear the window to a deep blue
	d3ddev->Clear(0, NULL, D3DCLEAR_TARGET, D3DCOLOR_XRGB(0, 40, 100), 1.0f, 0);

	d3ddev->BeginScene();

	drawSprite();	// draw sprite

	d3ddev->EndScene();

	// displays the created frame on the screen
	// translate backbuffer to frontbuffer
	d3ddev->Present(NULL, NULL, NULL, NULL);
}

// this is the function that cleans up Direct3D and COM
void cleanD3D(void)
{
	d3ddev->Release();    // close and release the 3D device
	d3d->Release();       // close and release Direct3D
}
Cài đặt Sprite cơ bản
Các thao tác chính:
- Khai báo: Sprite Handler, Texture, Information of sprite
- Khởi tạo:
D3DXCreateSprite: gắn sprite handler vào Direct3D và deviceD3DXGetImageInfoFromFile: lấy thông tin SpriteD3DXCreateTextureFromFileEx: khởi tạo texture chứa Sprite
- Vẽ:
LPD3DXSPRITE::BeginLPD3DXSPRITE::DrawLPD3DXSPRITE::End
Thêm thư viện d3dx9.lib vào Linker/Input trong project của bạn trước khi bắt đầu.
Việc đầu tiên chúng ta sẽ khai báo các biến toàn cục, đặt trước WinMain
// sprite handler quản lý, gọi hàm thao tác sprite
LPD3DXSPRITE sprite_handler;
// texture lưu sprite
LPDIRECT3DTEXTURE9 texture = NULL;
// lưu trữ thông tin sprite
D3DXIMAGE_INFO info;
// path sprite
#define SPRITE_PATH L"pikachu.png"
Thực hiện thao tác khởi tạo trong hàm initSprite()
void initSprite()
{
	// biến kiểm tra thành công
	HRESULT result;

	// kết nối sprite handler với device và Direct3D
	result = D3DXCreateSprite(d3ddev, &sprite_handler);

	if (result != D3D_OK)
	{
		MessageBox(NULL, L"Can't associate main Direct3D and Device", L"Error", MB_OK);
		return;
	}

	// lấy thông tin sprite lưu vào biến info
	result = D3DXGetImageInfoFromFile(SPRITE_PATH, &info);

	if (result != D3D_OK)
	{
		MessageBox(NULL, L"Failed to get information from image file", L"Error", MB_OK);
		return;
	}

	// khởi tạo texture từ sprite
	/*
	Chỉ cần quan tấm đến:
	device,
	đường dẫn sprite,
	biến info lưu thông tin,
	màu cần trong suốt,
	texture để lưu sprite.
	*/
	result = D3DXCreateTextureFromFileEx(
		d3ddev,                   // device liên kết với texture
		SPRITE_PATH,		      // đường dẫn của sprite
		info.Width,			      // chiều dài của sprite
		info.Height,		      // chiều rộng của sprite
		1,
		D3DPOOL_DEFAULT,	      // kiểu surface
		D3DFMT_UNKNOWN,	          // định dạng surface
		D3DPOOL_DEFAULT,	      // lớp bộ nhớ cho texture
		D3DX_DEFAULT,		      // bộ lọc ảnh
		D3DX_DEFAULT,		      // bộ lọc mip
		D3DCOLOR_XRGB(0, 0, 0),   // chỉ ra màu trong suốt
		&info,			          // thông tin của sprite
		NULL,			          // đổ màu
		&texture			      // texture sẽ chứa sprite
	);

	if (result != D3D_OK)
	{
		MessageBox(NULL, L"Failed to create texture from file", L"Error", MB_OK | MB_ERR_INVALID_CHARS);
		return;
	}
}
Tiến hành vẽ Sprite (với kích thước full width, full height) lên màn hình, thao tác trong hàm drawSprite()
void drawSprite()
{
	// khóa surface để sprite có thể vẽ
	// D3DXSPRITE_ALPHABLEND hỗ trợ vẽ trong suốt nếu không thì để giá trị NULL
	sprite_handler->Begin(NULL);

	// cài đặt vị trí cần hiển thị lên màn hình
	D3DXVECTOR3 position(0, 0, 0);

	sprite_handler->Draw(
		texture,                        // texture lưu sprite
		NULL,                           // diện tích cần hiển thị
		NULL,                           // tâm dùng để vẽ, xoay
		&position,                      // vị trí sprite
		D3DCOLOR_XRGB(255, 255, 255)	// màu thay thế
	);

	// mở khóa surface để tiến trình khác sử dụng
	sprite_handler->End();
}
Kết quả
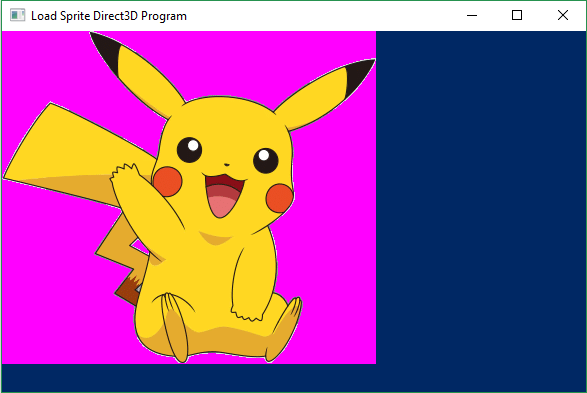
Đó là 1 chương trình cơ bản nhất, bây giờ thực hiện 1 số thao tác tùy chỉnh cho phần vẽ.
Cài đặt Sprite nâng cao
Vẽ Sprite trong suốt (sprite transparent)
Thực hiện 2 công việc:
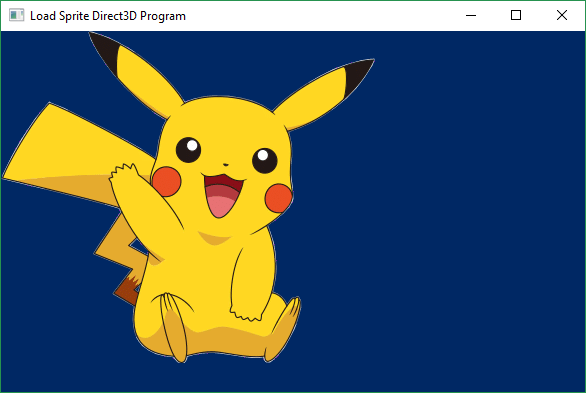
- Tại hàm
D3DXCreateTextureFromFileEx()sửa lại mã màu cần xóa, ở ví dụ trên là màu hồng (255, 0, 255). - Bật cờ
D3DXSPRITE_ALPHABLENDkhi gọi hàmLPD3DXSPRITE::Begin()
D3DCOLOR_XRGB(255, 0, 255), // chỉ ra màu trong suốt

// khóa surface để sprite có thể vẽ
// D3DXSPRITE_ALPHABLEND hỗ trợ vẽ trong suốt nếu không thì để giá trị NULL
sprite_handler->Begin(D3DXSPRITE_ALPHABLEND);
Kết quả
Thay đổi tâm vẽ
Tâm vẽ là 1 điểm trên Sprite lấy làm mốc để vẽ lên 1 vị trí trên màn hình, nó cũng là điểm làm mốc khi thực hiện các chuyển đổi scale, rotation, flip, translate. Giá trị NULL được hiểu ngầm là vị trí (0, 0, 0) trên sprite (góc trái phía trên).
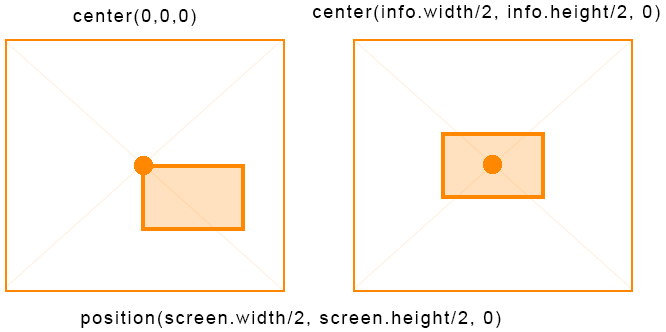
Tạo biến center lưu tọa độ cần làm mốc, ví dụ bên dưới sẽ hiển thị Sprite ở vị trí position(0, 0, 0) góc trái phía trên màn hình và lấy điểm chính giữa của Sprite làm mốc để hiển thị.
// vị trí cần hiển thị lên màn hình D3DXVECTOR3 position(0, 0, 0); // lấy điểm chính giữa, info lưu thông tin sprite D3DXVECTOR3 center(info.Width / 2, info.Height / 2, 0); sprite_handler->Draw( texture, NULL, ¢er, // tâm dùng để vẽ, xoay &position, // vị trí sprite D3DCOLOR_XRGB(255, 255, 255) );
Kết quả
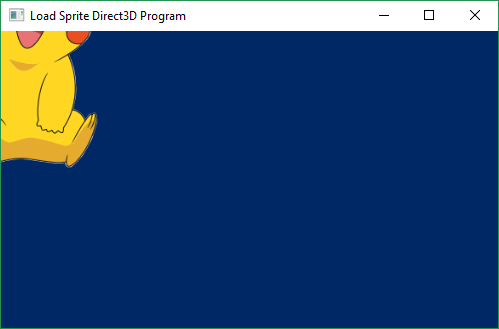
Cần chú ý đến tâm vẽ của Sprite để sau này có áp dụng 1 cách linh hoạt và nó rất cần thiết khi thao tác với Sprite animation.
Chỉ hiển thị 1 phần của Sprite lên màn hình
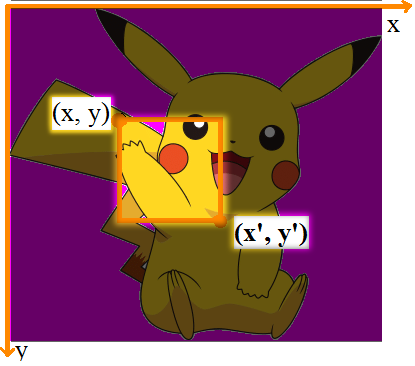
Khai báo biến srect để xác định diện tích cần vẽ.
// chỉ hiển thị 100x100
RECT srect;
srect.left = 115;	             // tọa độ x
srect.top = 110;		     // tọa độ y
srect.right = rect.left + 100;	     // tọa độ x'
srect.bottom = rect.top + 100;	     // tọa độ y'
Thêm srect vào hàm sprite_handler->Draw()
sprite_handler->Draw(
	texture,
	&rect,		// diện tích cần hiển thị
	NULL,
	NULL,
	D3DCOLOR_XRGB(255, 255, 255)
);
Kết quả
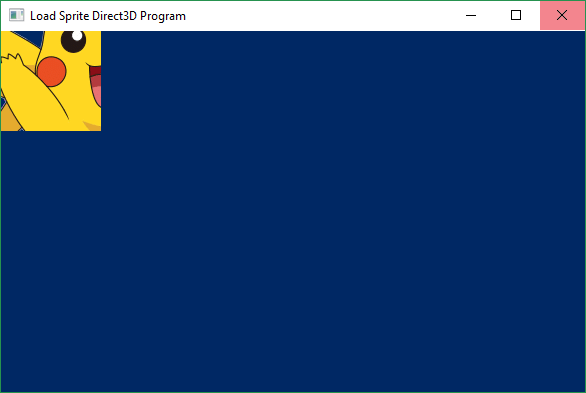
Scale (độ phóng đại), Flip (lật), Rotation (xoay), Translation (dịch chuyển)
Trong Direct3D, ma trận được sử dụng lưu thông tin trong suốt quá trình chuyển đổi, tùy theo nhu cầu cần thực hiện thao tác nào thì gọi hàm khởi tạo ma trận tương ứng.
Translation
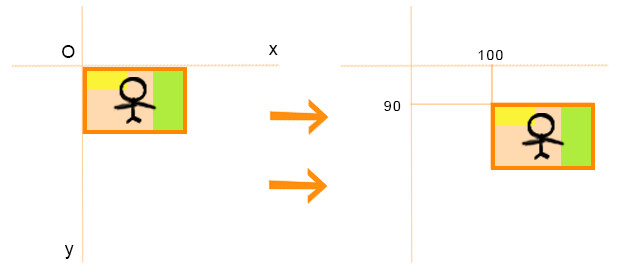
// khai báo ma trận lưu thông tin dịch chuyển
D3DXMATRIX matTranslate;

// khởi tạo ma trận để duy chuyển 100 theo trục Ox và 90 theo trục Oy
D3DXMatrixTranslation(&matTranslate, 100.f, 90.0f, 0.0f);

// Thực hiện việc chuyển đổi.
sprite_handler->SetTransform(&matTranslate);
Đây cũng là 1 cách để di chuyển Sprite thay vì phải tạo 1 biến position (lưu vị trí Sprite trên màn hình) như những ví dụ trước. 1 điểm cần lưu ý, khi sử dụng ma trận để dịch chuyển Sprite thì không cần tạo biến position mà để giá trị ở đối số thứ 4 của hàm sprite_handler->Draw() là NULL. Nếu sử dụng cả 2 cách để dịch chuyển thì giá trị dịch chuyển cuối cùng sẽ được cộng lại (x cộng theo x, y cộng theo y).
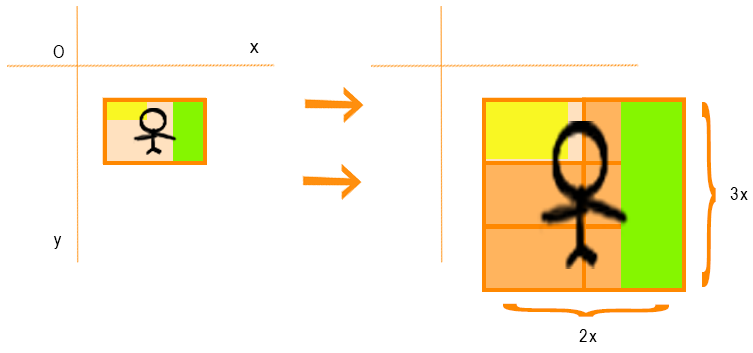
Scaling
// ma trận lưu thông tin về tỉ lệ
D3DXMATRIX matScale;

// khởi tạo ma trận phóng to theo trục Ox 2 lần, trục Oy 3 lần.
D3DXMatrixScaling(&matScale, 2.0f, 3.0f, .0f);

// thực hiện việc chuyển đổi.
sprite_handler->SetTransform(&matScale);
Flipping
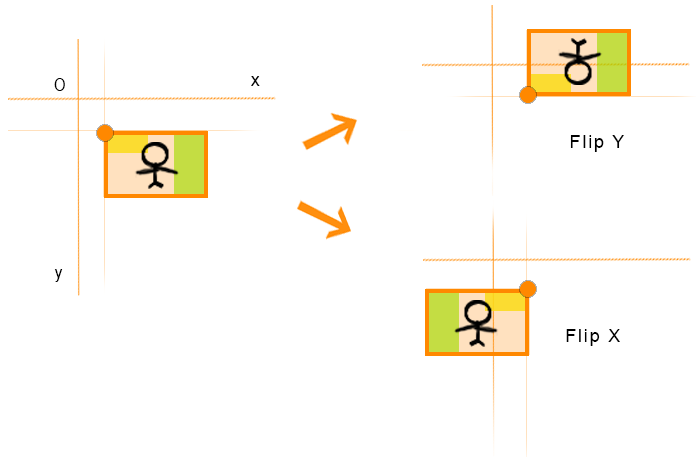
Cách đơn giản nhất là thực hiện dựa trên thao tác scale, thêm dấu - trước trục Ox/Oy cần flip.
// khởi tạo ma trận phóng to theo trục Ox 1 lần, trục Oy 1 lần.
// flip theo chiều dọc (trục Oy)
D3DXMatrixScaling(&matScale, 1.0f, -1.0f, .0f);

// flip theo chiều ngang (trục Ox) và chiều dọc (trục Oy)
D3DXMatrixScaling(&matScale, -1.0f, -1.0f, .0f);

// phóng to theo trục Ox 2 lần, trục Oy 2 lần
// và flip theo chiều ngang
D3DXMatrixScaling(&matScale, -2.0f, 2.0f, .0f);
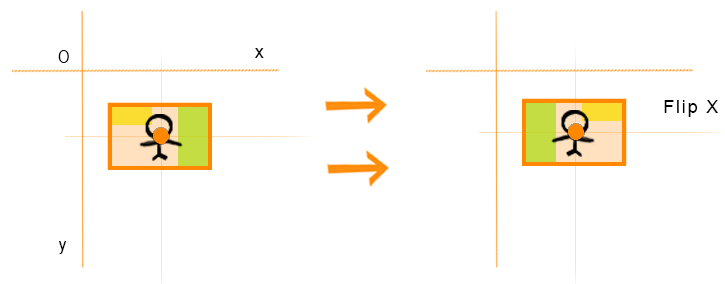
Để dễ kiểm soát cho việc chọn điểm mốc để flip và vị trí hiển thị lên màn hình, kết hợp với tâm vẽ như đã giới thiệu ở nội dung phía trên.
// lấy điểm chính giữa sprite D3DXVECTOR3 center(info.Width/2, info.Height/2, 0); sprite_handler->Draw( texture, NULL, ¢er, //tọa độ làm mốc để flip và vị trí vẽ trên màn hình NULL, // giá trị null D3DCOLOR_XRGB(255, 255, 255) );
1 điểm cần lưu ý, khi thực hiện flip Sprite nếu muốn dịch chuyển thì cách tốt nhất là sử dụng ma trận để dịch chuyển. Nếu sử dụng cách tạo biến position thì kết quả sẽ không như mong muốn, để khắc phục thì thêm dấu - trước tọa độ x và y như sau position(-x, -y, 0).
Rotation
// ma trận lưu thông tin xoay
D3DXMATRIX matRotate;

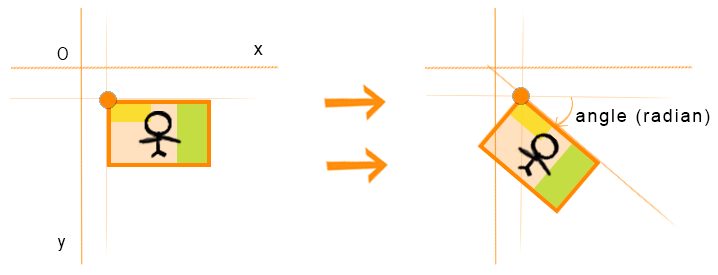
// khởi tạo ma trận xoay 30 độ từ phải sang trái
D3DXMatrixRotationZ(&matRotate, D3DXToRadian(30.0f));

// Thực hiện việc chuyển đổi.
sprite_handler->SetTransform(&matRotate);
Đối số thứ 2 của hàm D3DXMatrixRotationZ() là góc muốn xoay được tính bằng radian. Direct3D cũng cung cấp 1 số hàm xoay trong 3D như D3DXMatrixRotationX() xoay theo trục Ox, D3DXMatrixRotationY() xoay theo trục Oy, nhưng ở 2D chỉ cần quan tâm đến hàm D3DXMatrixRotationZ() xoay theo trục Oz.
Cũng giống như thao tác flipping, cũng có thể kết hợp với tâm vẽ chọn điểm làm mốc để xoay và vẽ Sprite lên màn hình.
Kết hợp Translation, Rotation, Flip và Scale
Trong thực tế khi thao tác với Sprite cần phải thực hiện nhiều thao tác chuyển đổi cùng lúc, nếu sử dụng cách thông thường là gọi nhiều hàm sprite_handler->SetTransform() để thực hiện chuyển đổi tương ứng thì khi đó sẽ có vấn đề xảy ra là sai số ngày càng lớn và hiệu suất, do đó chỉ thực hiện được chuyển đổi cho lời gọi hàm cuối cùng.
Giải quyết vấn đề này bằng cách nhân các ma trận lại với nhau thành 1 ma trận mới và gọi hàm sprite_handler->SetTransform() để thực hiện việc chuyển đổi.
// nhân các ma trận lưu thông tin các chuyển đổi
sprite_handler->SetTransform(&(matScale * matRotate * matTranslate));
Hoặc có thể khai báo 1 ma trận đơn vị (identity matrix) để lưu kết quả các phép nhân.
// khai báo ma trận mặc định
D3DXMATRIX matCombined;
// khởi tạo ma trận
D3DXMatrixIdentity(&matCombined);

// nhân với tỉ lệ phóng đại/ lật sprite
matCombined *= matScale;
// nhân với ma trận xoay
matCombined *= matRotate;
// nhân với ma trận dịch chuyển
matCombined *= matTranslate;

// áp dụng các chuyển đổi
sprite_handler->SetTransform(&matCombined);
Vẽ nhiều Sprite cùng lúc
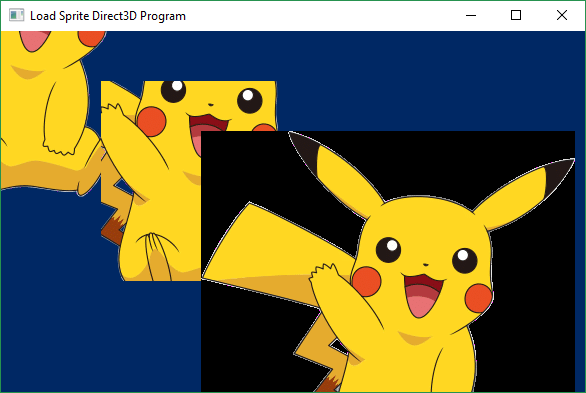
Để vẽ nhiều Sprite thì chỉ cần thiết lập thêm hàm sprite_handler->Draw() miễn sao nó phải nằm trong hàm sprite_handler->Begin() và sprite_handler->End(), hoặc có thể tạo thêm nhiều cặp Begin() và End() để vẽ khi muốn thay đổi chế độ trong suốt cho phù hợp với mục đích sử dụng.
Sprite vẽ sau hiển thị đè lên Sprite vẽ trước.
void drawSprite()
{
RECT rect;
rect.left = 115; // tọa độ x
rect.top = 110; // tọa độ y
rect.right = rect.left + 200; // tọa độ x'
rect.bottom = rect.top + 200; // tọa độ y'
// cài đặt vị trí cần hiển thị lên màn hình
D3DXVECTOR3 position(200, 100, 0);
D3DXVECTOR3 position2(100, 50, 0);
// biến info lưu thông tin sprite
D3DXVECTOR3 center(info.Width / 2, info.Height / 2, 0);
// khóa surface để sprite có thể vẽ
// D3DXSPRITE_ALPHABLEND hỗ trợ vẽ trong suốt nếu không thì để giá trị NULL
sprite_handler->Begin(D3DXSPRITE_ALPHABLEND);
sprite_handler->Draw(
texture, // texture lưu sprite
NULL, // diện tích cần hiển thị
¢er, // tâm dùng để vẽ, xoay
NULL, // vị trí sprite
D3DCOLOR_XRGB(255, 255, 255) // màu thay thế
);
sprite_handler->Draw(
texture,
&rect,
NULL,
&position2,
D3DCOLOR_XRGB(255, 255, 255)
);
// mở khóa surface để tiến trình khác sử dụng
sprite_handler->End();
// vẽ sprite không trong suốt
sprite_handler->Begin(NULL);
sprite_handler->Draw(
texture,
NULL,
NULL,
&position,
D3DCOLOR_XRGB(255, 255, 255)
);
sprite_handler->End();
}Kết quả cho ví dụ trước
